Showing posts with label 4th grade. Show all posts

Sunday, October 31, 2010

Autumn Tree Silhouettes

The past month has been bizarrely warm, producing some amazing and inspiring sunsets. Every drive home, I've been amazed at the vivid colors and beautiful silhouettes that have occurred. Most of the photos below were taken on my mostly boring drive home(by the way, I don't recommend driving while taking pictures!)

I knew I had to do a lesson on silhouettes!


4th grade looked at artist Kara Walker, while we discussed what silhouettes are. We talked about how the nature of silhouettes are mysterious because of the lacking detail. I had the students analyze Walker's art and come up their own interpretations of her work.


To make our autumn tree silhouettes, we started by painting a 12x18 piece of paper in a variety of fall colors. I gave little direction at this step other than demonstrating a variety of painting techniques(color mixing, swirls, etc). I also told them to make sure that multiple colors are visible, to avoid them mixing every color together. Although a few students couldn't resist mixing colors to make a single-colored background, but they turned out amazing regardless! Art is all about breaking rules, right!?

The next week, students used oil pastels to add line details to their paintings. Then they used black paint to add their tree silhouettes. I only demonstrated how to paint the trees, but they came up with many great ideas on items to add, like people jumping in a pile of leaves, birds, tire swings, etc. I am always amazed and inspired at my student's innovative ideas!

Lastly, the students had the option to add sequins to their paintings to represent leaves. Students displayed sparse leaves dangling on a branch, swirling leaves in the wind, and a heaping pile of leaves waiting to be jumped in!


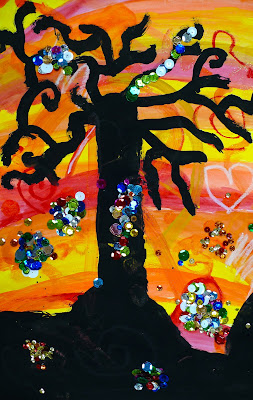


These paintings are hands down more beautiful than the glowing skies I've been witnessing on my drives home! My favorite thing about them is that no two paintings are alike even though we used the the exact same colors and subject-matter!

Check out a forrest of these beautiful trees on Artsonia!


Saturday, September 25, 2010

Happy Accidents

I don't paint things. I only paint the difference between things.
-Henri Matisse

I'd say that one of the most important things that the kids take away from my class would have to be critical/creative thinking skills. Over painting, drawing, sculpture, or any artist or art history, I feel that creative problem solving is the most meaningful in students' lives. Try as I might, not every student will become an artist or even continue to have a place in their lives for art, so I feel that giving students the ability to see possibilities instead of obstacles is something that every student can take with them the rest of their lives in whatever they do.

This year I'm really focusing on the idea of happy accidents; taking something that you didn't expect and turning it into something even better. Aside from this being a great way to increase problem solving skills, this philosophy also decreases the amount of paper thrown out from so called 'mistakes'!

This lesson starts with talking about geometric and organic shapes. This little animation is a neat way to introduce the concept. We then practice by drawing examples of geometric and organic shapes on the board and in our sketch books.

The kids start by drawing geometric shapes and then coloring them in with water-based markers. I tell students that the colors will blend and run together, so to think about what colors they could put next to each other for interesting effects. I really like telling the kids that artists are sort of like scientists; we try lots of things in order to discover different possibilities!

The students then drip water onto their drawings. The bleeding of the markers creates beautiful and interesting organic shapes as it dries. Using ultra-fine sharpies, the final step is to outline the geometric and unexpected organic shapes to create the finished composition.

'It's not that I'm so smart, it's just that I stay with problems longer'
-Albert Einstein


These 'happy accidents' make me very happy indeed! They are even more beautiful than I even expected!

Check out all of my kiddo's work on Artsonia!

Monday, September 6, 2010

Color Wheel Spinners

What could possibly be better than art? Art that SPINS!

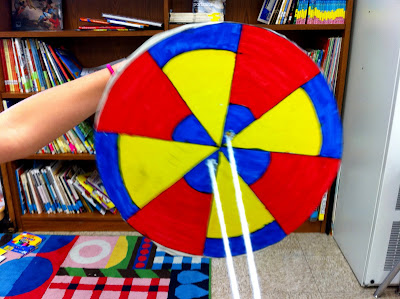
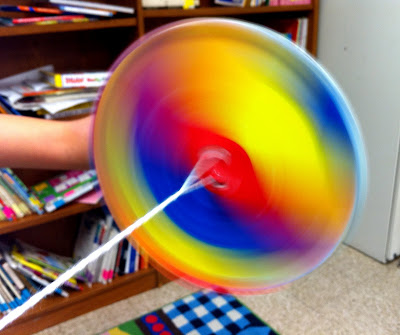
4th grade did an amazing job creating their color wheel spinners! It was such an inspiring scene to witness twenty something kids spinning their color wheels at once, knowing they were experiencing color mixing, not being told what it was. They were amazed at how they could 'trick' their eyes into seeing colors that weren't there.

We started off reviewing color theory. In fourth grade, they already know about primary and secondary colors, but I think it's important to touch on it again before we move on to tougher concepts involving color later in the year.

We then talked about optical illusions. I showed them works by Bridget Riley to give examples of how something two-dimensional can appear to be moving. We talked about why an artist would want their art to look like it's moving. One student said that it's like the person looking at the art is part of the art. I LOVE how much I learn from the kiddos!


Using red, yellow and blue markers, the students started coloring in a worksheet using a code to know which color goes where. Usually, I don't like giving such prescribed projects, but the placement of the colors is crucial to see the secondary colors form. To give them creative freedom, I had them design the back of the spinner( I told the kids they are color scientists and that they are experimenting to see what happens with their designs when they spin it).

After the worksheets are completed, the students cut out the circles and traced it onto a piece of light cardboard(make sure it's light enough for the kids to cut, or have them pre-cut). They then pasted the designs onto the cardboard and poked two holes in the center of the circle( I made two little circles on the worksheet, so students would know where to make the holes). The students cut a piece of string, the length of their arm-span, and thread it through the two holes. They tied the two ends together so that it made a loop. Then they placed the circle in the center of the string, and started winding.

It takes a little bit of practice to get the spinning technique down. It's important that the circle is centered between the pieces of string and that the circle stays vertical while you spin it. Make sure to give the kiddos plenty of time to spin away!

Check out the spinning in action!


When kids get to experience learning, it sticks(and spins!)